Table Of Contents
Purpose of the Intro
When creating a new Azure Virtual Network, it is of paramount importance to select the correct layout and addressing schema in order to minimise IP space allocation waste and maximise the opportunities for future growth. We also want to avoid IP range overlap as this will block the ability to add VPC peering should centralisation of (Ingress/Egress) traffic be required. Azure’s network infrastructure is very similar to AWS (For AWS see the following). The below section describes criterias to design both production and non-production deployments.
Azure VNets vs AWS VPCs
If you are used to using the AWS VPC guidelines it is important to understand the differences between Azure Virtual Networks (VNets) and AWS VPCs. Here’s how they are similar:
- VNets and VPCs are free
- VNets and VPCs are deployed into regions
- VNets and VPCs are created from a IP range, and can be subdivided into subnets
- VNets and VPCs can connect to each other via peering, so it’s paramount that IP ranges don’t overlap between networks
And here’s how they are different:
- VNet subnets by default are all “private”, meaning that resources (e.g. a VM) deployed into a VNet don’t allow ingress
- Also, by default, VMs have full egress access outside of the network (i.e. the internet)
- Resources in VNets are exposed to the internet by attaching a public IP to the resource, or attaching an internet-facing resource like a load balancer
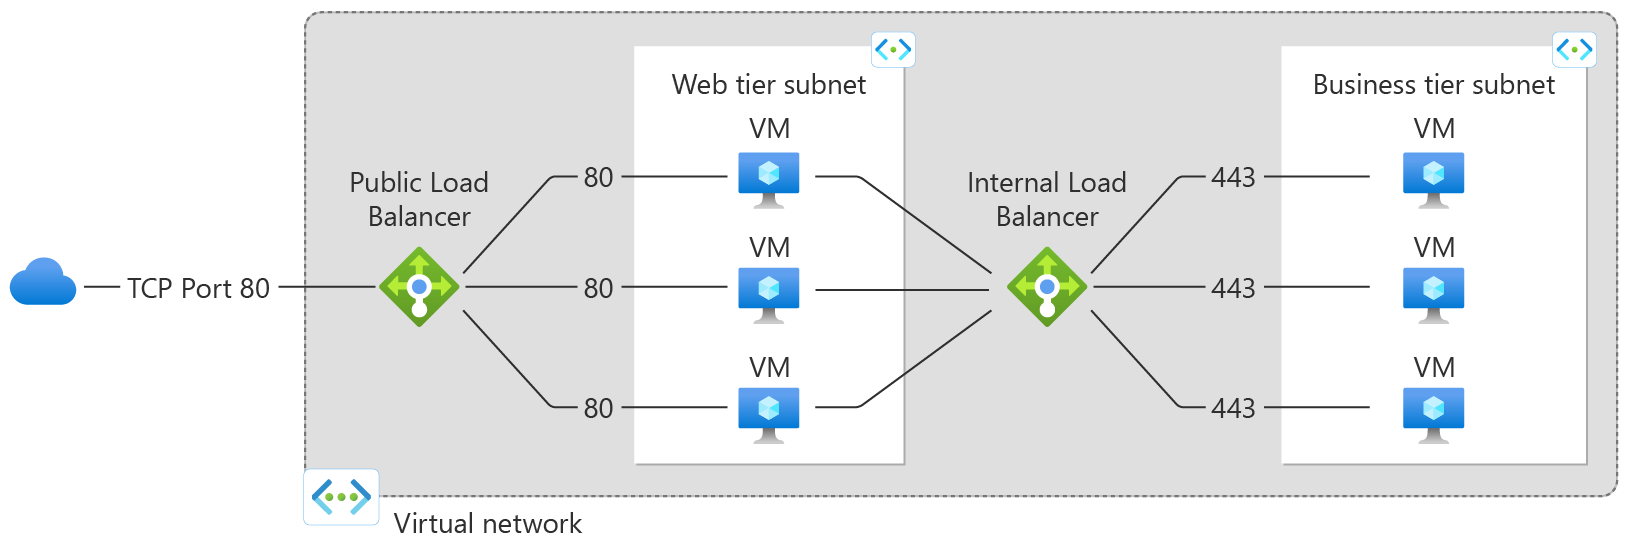
- Internet-facing resources like load balancers are not deployed into a subnet, like in AWS. They are managed by Azure outside of a subnet, see diagram below
- VNets and VPCs both have security groups to control ingress/egress traffic
- However, Azure SGs can be assigned to subnets as well as VMs
- Azure SGs have a priority numbers, like ACLs, so higher priority SGs are processed first
- Azure SGs can allow or deny traffic, while AWS SGs can only allow
- Azure SGs can use “service tags” as the network source, which are Azure network resources, like VirtualNetwork or AzureLoadBalancer
Production Deployments
Design important systems with redundancy across multiple zones or regions.
For production environments, deploy in at least 3 Zones (if available). Services (and relevant data stored on Instances if any) should be replicated in all Zones in the region.
Special care should be given by application designers to introduce Zone awareness to their software architecture. Azure charges a fee for Inter-Zone traffic, application should be Zone aware and rely as much as possible on application endpoints/resources in the same Zone, only using different Zones as fallback.
Rationale
The rationale for using 3 Zones for a production deployment follows the Two is One, One is None rule, to minimise the blast radius of a single Zone failure (as recommended by Azure) and reduce customer pain.
While a deployment with 2 Zones would satisfy the minimum requirement for redundancy, the load due to traffic must be considered. In case of a 3 Zones deployment with one failed Zone, the infrastructure on the remaining zones will have to support roughly 50% of the load, while in a 2 Zone deployment the remaining Zone must support the entirety of the traffic in the region.
Development/Staging/Integration Deployments
For non-production environments, a single-Zone deployment is acceptable, provided that the software architecture doesn’t require a multi-Zone setup (e.g.: for testing data allocation strategies/data replication/etc)
Rationale
Non-production environments should not contain customer data or serve customer traffic and should be scaled to the minimum size allowable for functional testing. A failure in a testing environment might have an impact on development activities, but won’t create customer pain.
Cost for non-production environments is generally negligible on a per-product basis when compared to production environments, but given the high demand for such environments across the platform the cost quickly adds up, so adopting cost reduction strategies is paramount.
Subnets
Each subnet is dedicated to a region and can contain different IP ranges as long as they don’t overlap. Decide which regions are required and create the subnet for a particular traffic type within that region remembering that traffic transparently moves across zones.
Choosing the type of subnets required for a deployment should be determined as early as possible during the design phase. While adding a new subnet type in a preexisting deployment is feasible, it requires great effort.
Each Region will require a subnet of each type, it is therefore recommended to follow the following example addressing schema:
CIDR Block: 10.0.0.0/18 - 16,384 total global addresses

  Subnet 1: 10.0.0.0/20 - 4091 usable IP addresses
  Subnet 2: 10.0.0.0/20 - 4091 usable IP addresses
  Subnet 3: 10.0.0.0/20 - 4091 usable IP addresses
  Subnet 4: 10.0.0.0/20 - 4091 usable IP addresses